


최종 결과
🎂 과제 목표
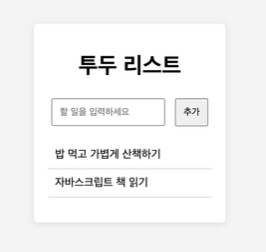
1) HTML로 기본 구조를 만든다.
2) 자바스크립트로 할 일 추가 기능을 구현한다. (입력 필드, 버튼)
🎂 추가로 시도한 것
1) 할 일 완료 표시, 체크박스 꾸미기
2) 할 일 삭제 기능
3) 배경, 버튼 그라데이션 색상 적용
4) 입력창이 빈 상태일 경우 alert 띄우기
구현 방법
🥐 입력을 받아 할 일 목록에 추가하기 + 입력창이 비었을 때 alert + 삭제
<div class="userInput">
    <input type="text" id="taskInput" placeholder="할 일을 입력하세요!">
    <button type="submit" id="taskAddButton">추가</button>
</div>
<div class="listBody">
    <ul id="list">
    </ul>
</div>
'할 일(task)'들은 같은 분류의 요소들이 모여있는 목록이기에 ul로 만들기로 했고, 사용자가 입력한 요소들을 li로 추가하도록 구성했다.
// task 추가
const taskAddButton = document.querySelector('#taskAddButton');
taskAddButton.addEventListener("click", addTask);

const taskList = document.querySelector('#list');
const taskInput = document.querySelector('#taskInput');
function addTask() {
    let newTask = taskInput.value;
    if(newTask == "") {
        alert("할 일을 입력하세요!");
        return;
    }

    let newLi = document.createElement('li');
    newLi.className = "task";
    newLi.innerHTML = `
        <input type="checkbox" name="task" id="task${taskList.children.length + 1}">
        <label for="task${taskList.children.length + 1}">
        <span class="checkboxIcon"></span>
        <span class="taskContent">${newTask}</span>
        </label>
    `;

    let deleteButton = document.createElement('button');
    deleteButton.className = "taskDeleteButton";
    deleteButton.addEventListener("click", deleteTask);

    newLi.appendChild(deleteButton);
    taskList.appendChild(newLi);

    taskInput.value = '';
}

// task 삭제
function deleteTask(e) {
    e.target.parentElement.remove();
}
querySelector로 버튼, 할 일 목록, 입력창을 받아왔다.
버튼을 클릭했을 때 addTask()가 실행되면서 입력이 빈문자열일 경우 alert 메세지를 띄우고 반환한다.
li 요소를 만들어서 원하는 구조의 html을 추가해주었고 이 때 생성되는 버튼을 받아 이벤트를 설정하기 위해 button element도 따로 생성하였다.
삭제버튼을 누르면 부모요소인 li를 삭제한다.
처음엔 삭제버튼이 생성되기도 전에 addEventListener가 실행되는 구조여서 오류가 생겼었다. 특정 객체를 조작할 때 그 객체가 어떤 상태인지도 잘 고려해봐야겠다고 생각했다.
🥐 체크박스 꾸미기 + 할 일 완료
li.task > input[type="checkbox"] {
  display: none;
}

input[type="checkbox"] + label {
  display: flex;
  align-items: center;
  cursor: pointer;
}

.checkboxIcon {
  margin-right: 10px;
  width: 15px;
  height: 15px;
  background-color: transparent;
  border: 1px solid black;

  position: relative;
}

input[type="checkbox"]:checked + label .checkboxIcon::after {
    content: "✔";
    text-align: center;
    font-size: 1.5rem;

    position: absolute;
    top: -125%;
}

input[type="checkbox"]:checked + label .taskContent {
  text-decoration: line-through;
}
기본 체크박스를 보이지 않게 설정하고, label 내에 체크박스 아이콘으로 사용할 요소를 만든다.
체크박스가 체크된 상태일 때 체크박스 아이콘 요소에 가상 요소를 생성하여 내가 원하는 체크 기호를 넣어주었다.
체크박스가 체크된 상태일 때 글자가 담긴 taskContent에는 가로지르는 줄을 그어줬다.
🥐 배경, 버튼에 그라데이션 색상 적용
.userInput > button {
  width: 10%;

  border: none;
  background-image: linear-gradient(to right bottom, #5575ff, #e064ff);
  color: white;
}
linear-gradient()를 사용하여 적용했다.
linear-gradient는 image의 일종인 gradient를 반환하기 때문에 background-color가 아닌 background-image 등에 적용해줘야 한다!
전체 코드
🍰 HTML
<!DOCTYPE html>
<html lang="en">
<head>
    <meta charset="UTF-8">
    <meta name="viewport" content="width=device-width, initial-scale=1.0">
    <title>Todo-List</title>
    <link rel="stylesheet" href="style.css">
</head>
<body>
    <div class="mainContainer">
        <div class="title">
            <h1>TODO</h1>
        </div>
        <div class="userInput">
            <input type="text" id="taskInput" placeholder="할 일을 입력하세요!">
            <button type="submit" id="taskAddButton">추가</button>
        </div>
        <div class="listBody">
            <ul id="list">
            </ul>
        </div>
    </div>
    <script src="script.js"></script>
</body>
</html>
🍰 CSS
@import url("https://fonts.googleapis.com/css2?family=Noto+Sans+KR:wght@100..900&display=swap");

* {
  margin: 0;
  padding: 0;
  box-sizing: border-box;
}

body {
  height: 100vh;
  display: flex;
  justify-content: center;
  align-items: center;

  background-image: linear-gradient(
    to right bottom,
    #b298ff,
    rgb(201, 241, 255)
  );
}

.mainContainer {
  border-radius: 20px;
  background-color: white;

  display: flex;
  justify-content: center;
  flex-direction: column;
  align-items: center;

  height: 60%;
  width: 30%;
}

.title {
  flex: 1;

  display: flex;
  align-items: end;
}

.title > h1 {
  font-family: "Noto Sans KR", sans-serif;
  font-optical-sizing: auto;
  font-weight: 400;
  font-style: normal;
}

.userInput {
  flex: 1;
  width: 100%;

  display: flex;
  justify-content: center;
  align-items: center;
}

.userInput > * {
  border-radius: 5px;
  height: 2.8rem;

  font-family: "Noto Sans KR", sans-serif;
  font-optical-sizing: auto;
  font-weight: 400;
  font-style: normal;
  font-size: 0.8rem;
}

.userInput > input {
  width: 70%;
  border: 1px solid lightgrey;
  margin-right: 0.5rem;
  padding-left: 1rem;
}

.userInput > button {
  width: 10%;

  border: none;
  background-image: linear-gradient(to right bottom, #5575ff, #e064ff);
  color: white;
}

.listBody {
  flex: 7;
  overflow: auto;

  width: 80%;
}

ul.list {
  list-style: none;
}

li.task {
  height: 2.5rem;
  margin-top: 0.5rem;

  display: flex;
  align-items: center;

  border-bottom: 1px solid lightgrey;

  font-family: "Noto Sans KR", sans-serif;
  font-optical-sizing: auto;
  font-weight: 300;
  font-style: normal;
}

li.task > input[type="checkbox"] {
  display: none;
}

input[type="checkbox"] + label {
  display: flex;
  align-items: center;
  cursor: pointer;
}

.checkboxIcon {
  margin-right: 10px;
  width: 15px;
  height: 15px;
  background-color: transparent;
  border: 1px solid black;

  position: relative;
}

input[type="checkbox"]:checked + label .checkboxIcon::after {
    content: "✔";
    text-align: center;
    font-size: 1.5rem;

    position: absolute;
    top: -125%;
}

input[type="checkbox"]:checked + label .taskContent {
  text-decoration: line-through;
}

.taskDeleteButton {
  background: url("asset/can.png") no-repeat center;
  width: 1.5rem;
  height: 1.5rem;
  margin: 0 10px 0 auto;
  border: none;
}

button {
  cursor: pointer;
}
🍰 JavaScript
// task 추가
const taskAddButton = document.querySelector('#taskAddButton');
taskAddButton.addEventListener("click", addTask);

const taskList = document.querySelector('#list');
const taskInput = document.querySelector('#taskInput');
function addTask() {
    let newTask = taskInput.value;
    if(newTask == "") {
        alert("할 일을 입력하세요!");
        return;
    }

    let newLi = document.createElement('li');
    newLi.className = "task";
    newLi.innerHTML = `
        <input type="checkbox" name="task" id="task${taskList.children.length + 1}">
        <label for="task${taskList.children.length + 1}">
        <span class="checkboxIcon"></span>
        <span class="taskContent">${newTask}</span>
        </label>
    `;

    let deleteButton = document.createElement('button');
    deleteButton.className = "taskDeleteButton";
    deleteButton.addEventListener("click", deleteTask);

    newLi.appendChild(deleteButton);
    taskList.appendChild(newLi);

    taskInput.value = '';
}

// task 삭제
function deleteTask(e) {
    e.target.parentElement.remove();
}'프로젝트 > 개인 과제' 카테고리의 다른 글
| 한식메뉴 렌더링하기 (0) | 2024.06.26 |
|---|---|
| [Javascript] 숫자기억게임 만들기 (0) | 2024.06.20 |